More Woodturning Magazine
https://www.morewoodturningmagazine.com
This Product Reviews page was printed exclusively for More Woodturning Magazine subscriber:
at:
Product Reviews
June 2017
 Click ad to visit our sponsor
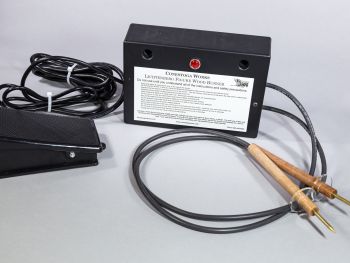
To my knowledge, there is only one commercially offered Lichtenberg Figure Wood Burner available to the artistic community. Watching YouTube®, you'll find a host of homemade versions. Most of these are cobbled up high voltage transformers that have been scavenged from other applications. Not only are these home-built versions less than ideal from a functionality standpoint, they can be extremely dangerous to the user based on the user's expertise, selection of materials, and high voltage construction skill sets. You have your choice of a re-purposed high-voltage transformer and your own wiring/electrical connections, which can be extremely dangerous, or a commercially-designed and built unit. I opted for the much safer commercial unit.
Enter the Conestoga Works Lichtenberg Figure Wood Burner designed and built by someone with extensive experience in the field of high voltage. Charles Waggoner, the creator and manufacturer of the unit, has used his many years of high voltage experience in the military to create this unit. Designed from the ground up to safely perform the process, it is a joy to use while exploring the art of Lichtenberg Burning.
What Do You Get?
The burner arrived nestled perfectly into the USPS® medium-sized Priority Mail® box. Fitting perfectly and packed so safely, it arrives in perfect shape, barring brutal handling in transit. On the very top (and perhaps the most important) is the instruction package. The four pages are packed with everything you need to know to be successful even if you have never before been exposed to the process. Under the instruction package and the shipping pads, you'll find the Conestoga Works Lichtenberg Figure Wood Burner. It is all in one piece. Everything is wrapped and cable tied to be compact and ship well. Carefully cutting the cable ties and unwrapping the cords and cables is all that is involved with readying the unit for operation.

Figure 1 - Everything fits nicely into a USPS Priority box

Figure 2 - Under the instructions is the entire one piece unit.
The Unit
By design, there are no on/off switches, adjustment knobs, fancy displays or any other items on the unit. Everything is sealed in the electrical construction black box. Out of the box on one end is the combination grounded power cord and on/off foot switch. Out of the other end are the two high voltage leads. The black box contains not only all of the electronics but two nests, one for each of the high voltage probes. After reading and understanding the instructions, you are just about ready to take the unit for a test run.
The Mechanics
The entire process is based on the current from the unit traveling through the wood, burning the wood in the process. The problem is that in dry wood, the conductivity is poor and even the high voltage can't overcome the dielectric of the wood. That's where the added dielectric comes in. A mixture of baking soda and water, two tablespoons to a quart is a good starting point, added to the surface of the wood will provide a conduction path with a dielectric strength low enough for the current to travel from one probe to the other. There are several variables involved that you can control. First is the species of the wood and the relative moisture level. Others include your dielectric mixture, the amount of dielectric added to the wood surface, grain orientation, and the probe placement. The Conestoga Works Burner is an all-electronic unit putting out 12Kv with a current limiter fixed at 35mA. You don't need to understand that, except that it works more slowly than the cobbled versions creating much more controlled burns. The other home-built units using similar voltages but much higher current start and burn in a far more uncontrolled and "blow torch" method.

Figure 3 - After reading the instructions, there is nothing to do but cut the cable ties and get started.

Figure 4 - Your entire set of controls and adjustments.

Figure 5 - Instructions on the front, two probe storage holes, and the "voltage on" light.

Figure 6 - The high voltage probes are intentionally not too long yet are a workable length.

Figure 7 - The total footprint.
The power cord on the left side of the box goes to the foot pedal on the floor. The power cord on the right side of the box goes to your outlet. You place the power supply box on the top of your workspace. The high voltage probes are nested in the holders provided in the face of the power unit.

Figure 8 - Each of the probes is constructed of a highly insulating phenolic tube with a safety ring below your grip.
The Unit Operation
With your workplace setup, using the instruction sheet guidelines for safety, you can locate your burner, place the foot switch in a convenient location, and plug it in. Having properly wetted your wood object, you place the probes as desired holding them securely, one in each hand. Once ready, you press the spring-loaded foot switch to the depressed and on position. You'll know it is on because the only light, a big red one, located on the face of the box, will turn on. Depending on all of your variables, you may have to wait a bit for the burn to begin. If something is awry, too much or too little dielectric, too much distance between the probes, or a troublesome species of wood, simply release the foot switch turning the unit off and place the probes in the holes in the face of the unit. The unit couldn't be simpler. Get things ready, plug it into the wall, and step on the foot switch for on and release the foot switch for off.

Figure 9 - A scrap piece of cherry with my dielectric mixed per the recommendations in the instructions.
How Well Does It Work?
I have no experience with the high current cobbled together versions so I can only compare my Conestoga experience to the videos of the other units on YouTube®. They seem to go like crazy, fast and furious, while the Conestoga is slow and deliberate. You can certainly burn deep if you wish but you don't have to. You can create very delicate burn patterns or trenches depending on your duration of burn and all of the other variables. Per the designer and maker, Charles Waggoner, his selection of components with voltage and current limit was very intentional. It was always a consideration of safety but his selection of components also gives the ability to create a unit to provide fine control. This unit fills the bill. While I am still in the learning mode, tweaking all of the variables available to me, I have thoroughly enjoyed the process. It, like pyrography, can result in a pretty picture or a burned out mess, depending on your goals and skill sets.
Construction
The Conestoga Works Lichtenberg Figure Wood Burner unit is well built using nothing but the best components available. The purchased components and fabricated components are absolutely top shelf with performance and safety being the criteria, not cost. The cord and foot switch cable length are adequate and very workable without being cumbersome. The high voltage cables are constructed with heavy duty, high voltage wire attached to the probe. The lengths are relatively short to keep you near the control unit and prevent any hang-ups or tangling. The brass probes are embedded into a phenolic tube with an acrylic safety ring attached to the tube preventing getting hands near the electrical probe itself. The instructions on use and in particular, the safety instructions, are informative and written in plain English. The instructions tell you that if you can't or won't follow the instructions for you own safety, don't use the unit. Just pack it up and return it for a refund.

Figure 10 - Another piece of cherry sliced the other way and much thinner. You have plenty of variables to experiment with to get your desired result.

Figure 11 - A practice piece, not washed of the added dielectric yet, nor are the burned areas cleaned. Dwell time and probe location will let you control delicacy and depth of burn.
The Bottom Line
As a total "newbie" to the world of Lichtenberg Figure burning, I was extremely impressed with this unit's superb design, quality build, and the simplicity of operation. I had an absolute ball using it. With zero experience, I read the instructions, mixed my dielectric, and began experimenting. It is addictive with the myriad of possibilities and the experimentation of learning. I admit my results aren't museum or gallery quality yet but there is a learning curve. If you want a tool to enable you to work with the Lichtenberg Figure Burning process, you can be confident that this unit will give you all you need to create your own artwork. I highly recommend it. It is a quality unit that does the job admirably and is built in the USA. You can find all of the technical details, examples of work, instruction sheets and more at their website at http://www.conestogaworks.com. The Conestoga Works Lichtenberg Figure Wood Burner currently sells for $299 USD. You can inquire with questions or purchase the unit from Conestoga Works through their website at http://www.conestogaworks.com/ or by phone at (405) 420-4686.
Submit Questions / Feedback on this Product Review
